Getting Started guide
Last updated - 27th February 2024
Overview
Getting started with the Service Framework and creating your first service should be the simplest task you can complete, the harder part is discovering what kind of services are useful to your project and how best to plan for them. The Service Framework has many advanced capabilities to handle most situations, however, let us get started with the basics and walk you through everything.
This is what this article will cover:
- Installing the Service Framework
- Adding the Global Service Manager
- Creating the root configuration for the Service Manager
- The Platform switcher
- Using the Service Generator
- Configuring your service
- Accessing your service
- Checking the Service Manager is ready
- See the running state of your service
- Check the API docs for more calls
Time to begin.
tip
If you want a more detailed example of a Service, we have added a "Setting Service" example in the Service Design section.
Installing the Service Framework
There are several different paths to install the Service Framework, which you choose will depend on how you prefer to access dependencies in your project:
Open UPM CLI
The simplest way too install the Service Framework is using the OpenUPM CLI which is an installable NPM package that will automatically download and register packages hosted on OpenUPM in to your Unity project.
This method does require npm (node package manager) to be installed on your machine, for more details see here.
Once Installed, simply open a command window/terminal in your Unity project (at its root) and use the OpenUPM CLI Command:
openupm add com.realitytoolkit.service-framework
Once complete, you can open your Unity project and the Service Framework and any dependencies will be automatically registered in your project.
Unity Package Manager - manual
Alternatively, you can register the scoped registry for the Service Framework manually in the Unity Package Manager in the editor.
- First, open up the Scoped Registry interface in the Unity editor and add a new entry in the Scoped Registry list:
Editor -> Edit -> Project Settings -> Scoped Registries
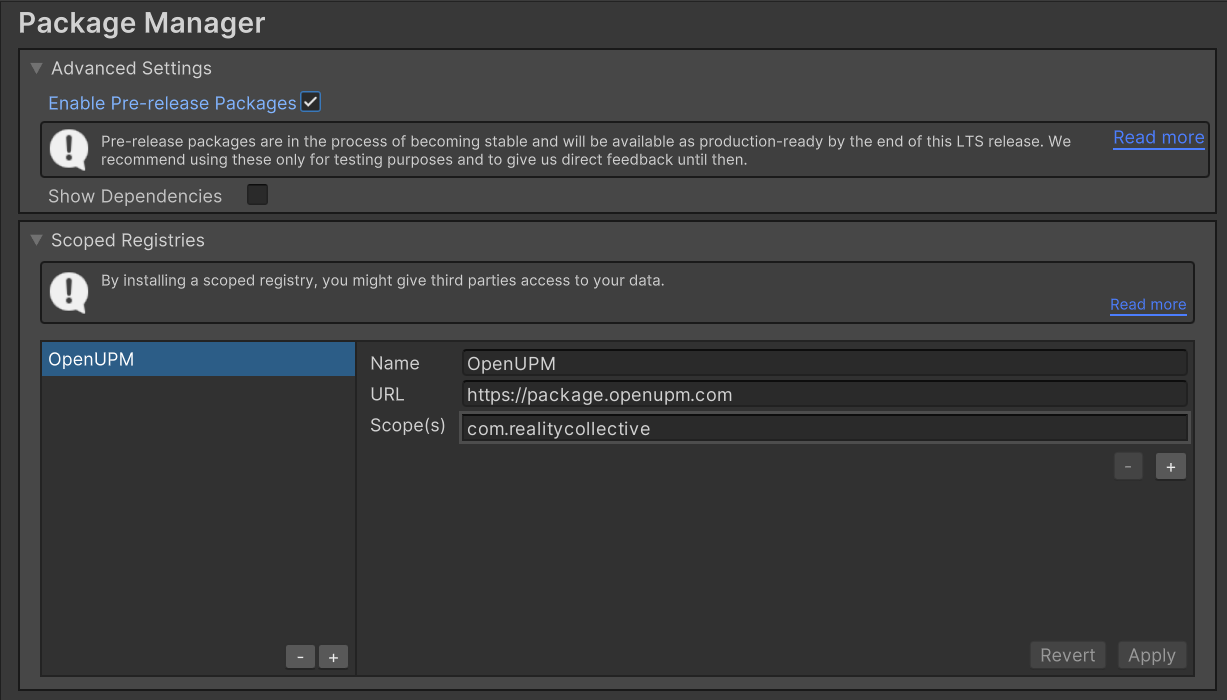
- Next, Enter the following details in to the window to the right:
    name: OpenUPM
    url: https://package.openupm.com
    scopes: com.realitycollective
Once entered, click the + button to add and save the registry.
For the Reality Collective packages (such as the Service Framework) that are still in preview, make sure to also check the
Enable Pre-Release packagesoption in the top of the Scoped Registry screen, as shown below.
- Finally, Open the Unity Package Manager, in the top-left most drop down, select
My Registriesand then select and click install on theService Frameworkentry to download and register the service framework and its dependencies in your project.
tip
Alternatively you can connect to the repository directly from Unity using the "Add package from Git url" option in the Unity Package Manager and using the URL for the repository below:
https://github.com/realitycollective/com.realitycollective.service-framework.git
Adding the Global Service Manager
The Global Service Manager is the ONLY MonoBehaviour GameObject that needs to be in a scene to operate any/all services that are registered with it, this ensures that all the events raised by Unity can be properly propagated (sent to) all the services.
tip
There is an additional pattern available whereby the Service Framework can be integrated with your own functionality, not requiring the additional GameObject, essentially providing the Service Framework as a property in your own code. see the Service Patterns and implementations for more information.
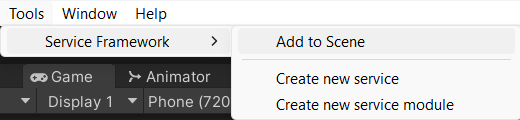
You can automatically add a Global Service Manager to your scene using the handy editor menu option:
Tools -> Service Framework -> Add to Scene
Or you can create it manually, as follows:
To begin, simply create an Empty GameObject (
Editor -> GameObject -> Create Empty) and name it theGlobal Service Manager.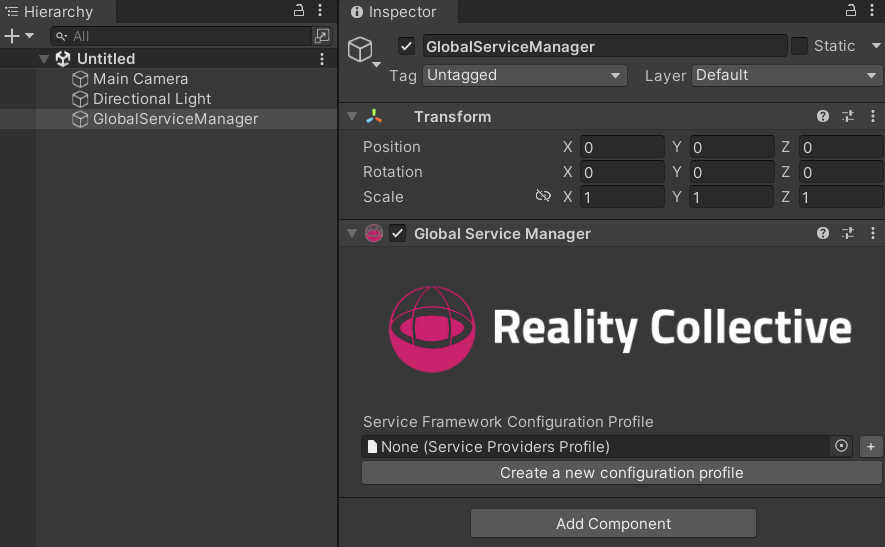
Then simply add the
Global Service Managercomponent by selecting the GameObject created in the previous step and clicking onAdd componentin the inspector and selectingService Framework -> Global Service Manager, or alternatively just searching for theGlobal Service Manager.
By default you will receive an information box telling you that you do not have any root configuration for the Service Framework available. The next section will walk you through creating it.
note
If you already have Service Framework configuration in your project, the editor will bring up a new window to select it if you have more than one. If you only have one, it will automatically be applied to your new Global Service Manager.
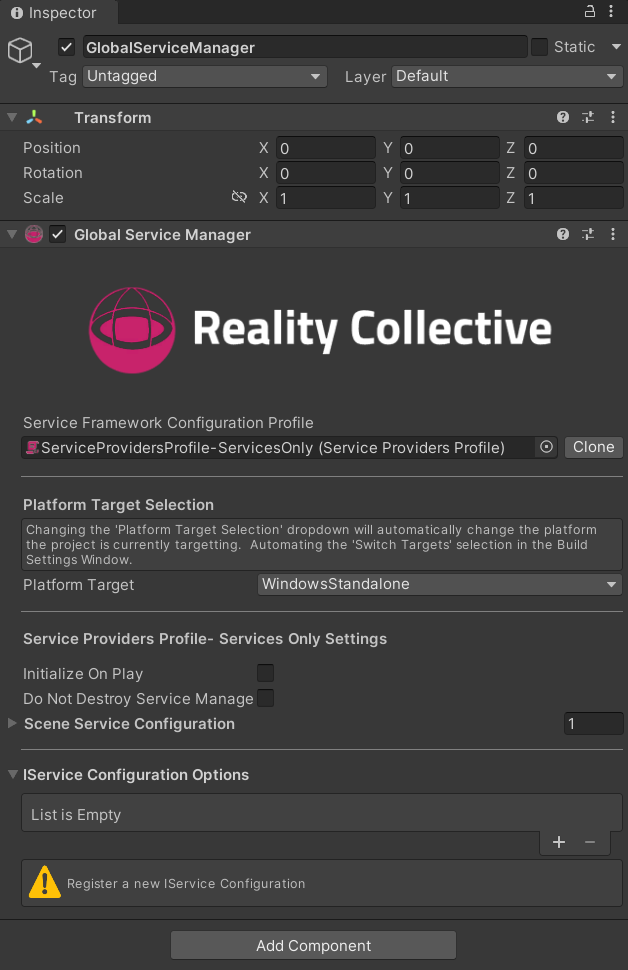
Now that the Service Manager is in your scene, you can select it to see its current configuration. By default, no configuration is applied and you will need to create your own configuration for it.
Creating the root configuration for the Service Manager
The simplest way to create your first new Root configuration for the Service Framework is to select the + symbol on the Reality Toolkit configuration Profile field in the inspector with the Global Service Manager selected, or simply click the Create a new configuration profile button below the profile field.
This will automatically create you a new configuration file called ServiceProvidersProfile in the root of your assets folder. Feel free to move this wherever you like in your assets folder as it will remain references to the instance of the Service Framework.
Alternatively, you can create it manually in the Project window by *right-clicking* and selecting *Service Framework -> Service Providers Profile*, which will create the new profile in the folder you are currently viewing. You will then need to manually assign this profile to the Service Manager by dragging and dropping it in to the "Reality Toolkit configuration Profile" field in the inspector.
tip
Also available through the "Assets" menu in the editor under the same path mentioned above.
Once configured, the Service Framework is ready to receive the services you create and get them running.
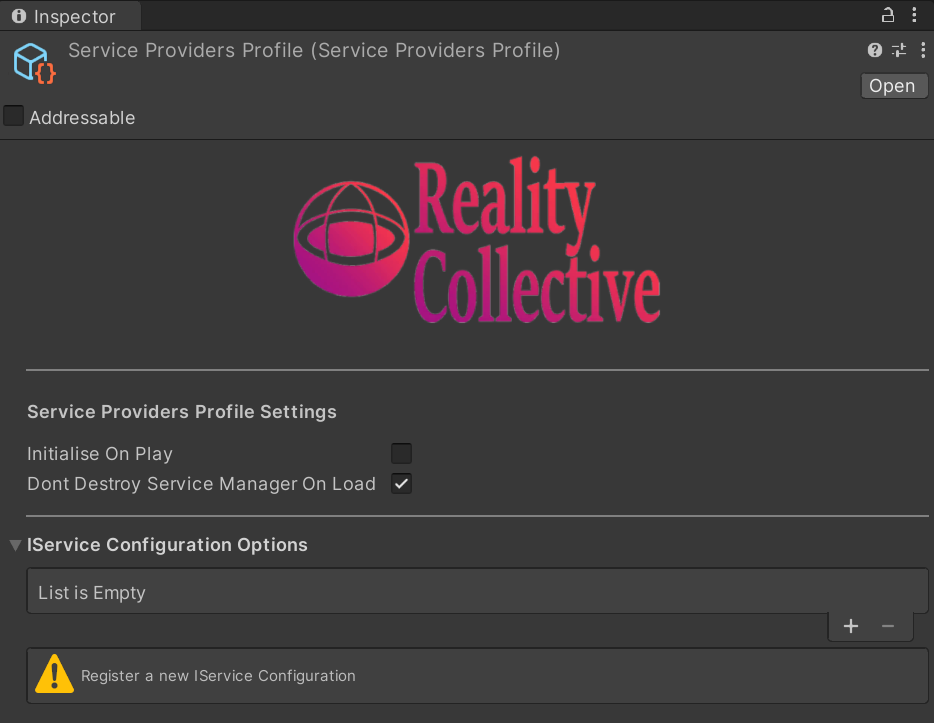
There are additional options you can enable on the Global Service Manager profile, which have the following behaviors:
Initialize on Play- Will only initialize the framework configuration when you hit Play in the editor, else it will always run and validate your configuration.
note
This does not affect runtime, the Service Framework always starts when the project is running.
Do Not destroy Service Manager on Load- By default, theGlobal Service Managerwill set itself to initialize in to a separate scene and will stay running for the life time of the project. If you want to have separate Service Managers in each scene, then disable this option.
The Platform switcher
Currently, the only way in Unity to switch your current build platform to another target is to use the Build Settings Window, select another platform and then click Switch Target.
However, to make life a bit easier, especially when working to build for different platforms, the Service Framework provides a handy drop down to quickly switch build targets, right from the Global Service Manager inspector:
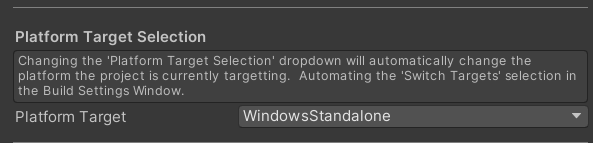
Changing this option to another platform will force Unity to switch build targets and reload scripts for that platform.
tip
By the way, this is about 50% or more faster than using the build settings window, just saying :D
Using the Service Generator
Creating your first service is relatively easy, the hardest part is knowing what you want your service to do.
info
Check out the examples in the Introduction).
To get you started with a new service we have included a quick and easy Service Generator to get you going.
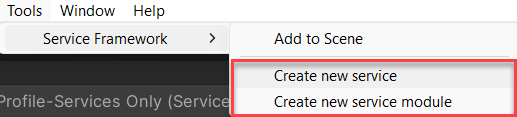
In the Unity Editor menu under Tools - Service Framework, you will find two entries for:
- Create new service
- Create new service module (to be covered later in Advanced Service Design)
On selecting the Create new service option, you will be presented with the Service Wizard window to choose your service generation options:
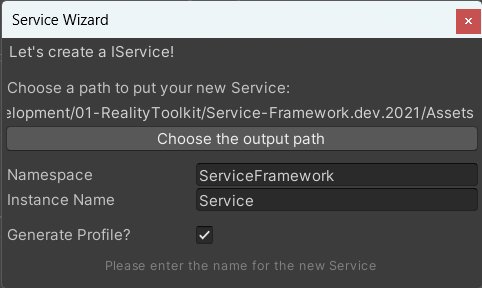
The options for generating your service are very easy to use, simply enter:
Output path- Where you want the service files to be generated into (the default is the root of your Assets folder) - use the button to change where the files are placed on generation.Namespace- The C# namespace you want to be applied to your service (we always recommend using a namespace to uniquely identify your own code)Instance Name- The new name for your serviceGenerate Profile?- If checked, the generator will also generate a scriptable object profile for you create editable controls for your service should you need them. Completely optional.
Once you have entered the details for your new service, just click on Generate! and the generator will automatically create a blank service, interface and profile (if you opted to generate a profile) in the folder you specified.

The Service Framework uses an Interface for the service to uniquely identify it for Registration and for Retrieval. It is also very useful for ensuring that any other implementations of the service (for other platforms or for creating a Mock implementation for Unit Testing) have the same implementation.
info
Only one instance of an Interface can be registered at a time for ANY service, as all services are individuals and accessed individually. It is possible to create an interface that depends on a shared parent interface, so that multiple services/modules can share an interface, but great care must be taken in doing so.
If you look in the newly generated service file, you will find documented instructions for the methods that are supported. Any you do not need or do not intend to use can be safely removed without any impact.
warning
DO NOT alter the Service Constructor signature, as this is used by the Service Framework when registering your service.
Please see the Service Design section for more details on how services are made and operated.
Configuring your service
With your service generated, it will now be accessible to register in the Service Framework configuration which you can access via the Inspector with the Global Service Manager selected:
tip
If you have not created the configuration shown above, you will need to do that now. The Service Framework ALWAYS needs a Root configuration to function.
To then add a new Service entry, simply click the + in the IService Configuration Options section, which will create a new entry to configure:
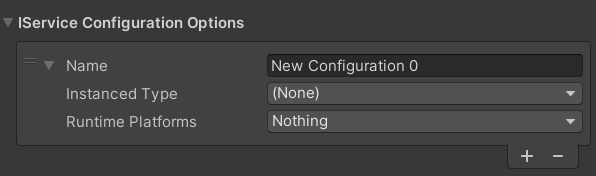
Here you you would apply the following settings:
Name- Give your Service a Name in the Name field (defaults to the actual name of the service)Instanced Type- Select your Service Instanced Type from the Drop-down (more on that shortly)
tip
Once the Instance Type is selected, you can also assign a Profile for the service if you generated the service with a profile, which is optional. Click + to create a default configuration for the Service.
Runtime Platforms- Select the Platforms the service will run on, the list shows what is available to Unity by default but can be extended
Clicking the Instanced Type drop-down shows the list of services detected by the framework, grouped by Namespace (that you entered when you created the service):

tip
If your service does not show up in the list, make sure the Namespace is accessible, especially if your Service is located in a folder with an Assembly Definition (which limits how code is accessed). Just create a new C# script and try to create a new instance of your Service Manually (var test = new TestService()).
If you ALSO want your service to be accessible when hitting Play in the Editor, make sure to also select the **Editor** platform (or select "Everything"). The system does EXACTLY as it is told and will only try to start your service on the platforms it is told to.
With your service configured and available to run it is now available from ANYWHERE in your project.
info
It is also possible to register services in Code rather than through the configuration screens. You can even mix and match, with some services registered in configuration and some registered in code. Just remember, a SINGLE service can ONLY BE REGISTERED ONCE, you will get a warning if you try to register the same service twice. See the Service Design for more details on using the Service Framework from code.
Accessing your service
Getting a reference or accessing the instance of your running service is VERY easy and the Service Framework offers two patterns for accessing your service.
warning
We only start querying for services from the MonoBehaviour Start method, during Awake services are still being registered and are not available yet!
Check your Service is registered
If there is ever a situation where you may not be sure your service is registered or running, the Service Framework has an easy check to see if the Service is currently registered with the Framework, this is done by calling the IsServiceRegistered function:
    if (ServiceManager.Instance.IsServiceRegistered<IMyNewService>())
    {
        // My Service is Registered
    }
This simply returns True if the Service is registered. You can also check if the Service is enabled (as Services can be disabled once registered) by using the IsServiceEnabled function.
Get a reference to your service using GetService
The common way to get a reference to your running service is to use the GetService function which requires the Interface Type of the service you wish to request.
var service = ServiceManager.Instance.GetService<IMyNewService>();
info
This will return null and log an error if the service was not found.
Safer access to Getting a Service
As an alternative to the GetService call there is also a TryGetService function which returns a Bool to denote whether the Service request was successful and an out parameter with the Service instance if it was found:
    IMyNewService myService = null;
    if(ServiceManager.Instance.TryGetService<IMyNewService>(out myService))
    {
        // My Service was found
    }
This is generally the better approach but it all depends on the usage of your service.
Checking the Service Manager is ready
Some MonoBehaviour components rely on the ServiceManager to be initialized to retrieve service dependencies. If the components are in a Base scene (A recommended pre-load scene for just the Service Manager), they may attempt to retrieve a service before the service manager has finished loading and is ready.
An API is available that allows code to conveniently wait for the manager to initialize:
Usage
private async void OnEnable()
{
    await ServiceManager.WaitUntilInitializedAsync();
    cameraService = await ServiceManager.Instance.GetServiceAsync<ICameraService>();
    cameraService.CameraOutOfBounds += CameraService_CameraOutOfBounds;
    cameraService.CameraBackInBounds += CameraService_CameraBackInBounds;
}
Alternatively, if you do not use async, an event is available on the service manager to delay requests until it is ready:
private void OnEnable()
{
    ServiceManager.Initialized += ServiceManager_Initialized;
}

private void ServiceManager_Initialized(ServiceManager instance)
{
    if(ServiceManager.Instance.TryGetService<IMyNewService>(out var myService))
    {
        // My Service was found
    }
}
See the running state of your service
A handy feature contributed by one of our community (Joost van Schaik) allows you to see the running state of your service and all its properties from within the editor.
Simply create an Empty GameObject with the same Name (The Name registered in the configuration and not the class name) as your service, add the Service Display Hook component, all the running properties of the Service will appear in the inspector for that service:
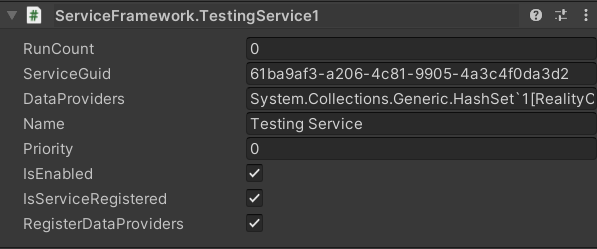
Very useful if you simply want to inspect what the service is doing.
We are looking to extend this in the future to also make it editable for testing.
Check the API docs for more calls
There are a few more accessors for getting references to services, such as:
| Function | Description |
|---|---|
GetServiceAsync | An Async version of the GetService call |
GetServiceByName | Return a service by its name |
GetServices T | Returns a collection of all services of an Interface Type currently registered |
GetAllServices | Returns a collection of all services currently registered |
DisableService | Disables a running Service |
EnableService | Enables a disabled Service |
DisableAllServices | Effectively pauses all running services |
EnableAllServices | Restarts all paused services |
See the API Docs (coming soon) for more detail.
Onward
Check the other documentation for more detail on how services work and how to extend them as the capabilities of the Service Framework are quite extensive.
More information
for more information on the Service Framework, check out these additional links: